You can drop components on the designer and set their size but theres no mechanism for dynamic size adjustments. In other words there is no Align, no Anchors, no Margins and no layouts (as TFlowPanel and TGridPanel in Delphi). We have to resize components in code, in the overloaded Resize method.
I quickly got sick of writing resizing code and decided to alleviate the problem by writing a layout manager. It does not work in the designer, you have to declare and use it in code, but still it is a big simplification over the default "just call SetBounds from Resize" approach. I donated layout manager to the Smart project and it is included in the 1.0 release as the w3layout unit.
This article starts a short series which will explain layout manager on simple examples. All of those examples are also included with the Smart installations (look in Demos, LayoutManagerDemo).
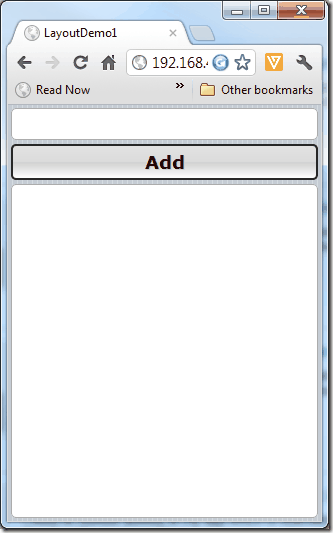
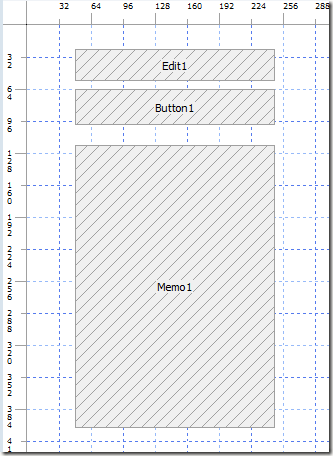
The first example (LayoutDemo1 project) replicates one of first Delphi demos Edit/Button/Memo. We want to have an edit field on the top of the form, a button underneath it and a memo control which fills all the remaining form space.
We can start by dropping controls on the design form and renaming them appropriately.
In Delphi we would simply set Edit1.Align to alTop, Button1.Align to alTop and Memo1.Align to alClient. Well, we can do something similar in Smart.
procedure TForm1.InitializeObject;
begin
inherited;
{$I 'Form1:impl'}
FLayout :=
Layout{1}.Client(Layout.Margins(3).Spacing(3), [
Layout{2}.Top(Edit1),
Layout{3}.Top(Button1),
Layout{4}.Client(Memo1)
]);
end;
This code creates a layout (FLayout is defined a field of type TLayout in the form class). This layout contains of an outer layout 1 (marked {1} in the code) containing three inner layouts (2, 3, 4). Each of the inner layouts contains its own component.
Layout Basic
Before I continue I shall say something about layouts so that youll understand better whats going on.
Each layout lies in a container. In the example above, layout 1 doesnt have container defined (well fix this in the Resize) while layouts 2 to 4 are contained in the layout 1.
Each layout can contain one or more components, where by a component I mean another layout or a Smart control.
Each layout can have configuration options defined. Configuration options are passed as an optional first parameter. In the example below, layout 1 has margins set to 3 and spacing to 3.
Margins specify the distance between the layout and the container which holds this layout. You can set all margins to the same number or specify different value for each margin (top, bottom, left, right).
Padding (not used in this example) is similar to margins but works inside. Padding specifies the distance between the layout and contained controls.
Spacing only applies to a layout that contains more than one control and specifies additional spacing between controls.
Layout can be Top, Bottom, Left, Right, or Client aligned.
Some placement parameters (position, size) can be determined from the external container (the one I said well specify in the Resize). Others are taken from the contained control. In the example above, Layout 2 height will be set from the Edit1 height. Same goes for the Layout 3 height. Edit1 and Button1 width will be, however, determined from the layout width. It sounds complicated but really isnt. Think about what happens in Delphi when you set the Align property. Some placement parameters are set automatically and other are left alone. [For the alTop layout, for example, Left, Top, and Width are set while Height isnt.] The same placement parameters are set automatically in Smart while other (Height in the example of a Top alignment) are determined from the nested controls.
You can set layout width and height manually by providing a first parameter of Layout.Width or Layout.Height.
Resizing layouts
The code above only defined a layout, it didnt resize it. To do that, we have to add one line to the overloaded Resize method.
procedure TForm1.Resize;
begin
inherited;
FLayout.Resize(Self);
end;
With that we are telling the layout manager that the outside container is the form itself (Self) and that the layout should please place itself into this form.
Example, revisited
I tried to document the layout were talking about in a graphical form. Maybe this will make the concepts easier to understand.
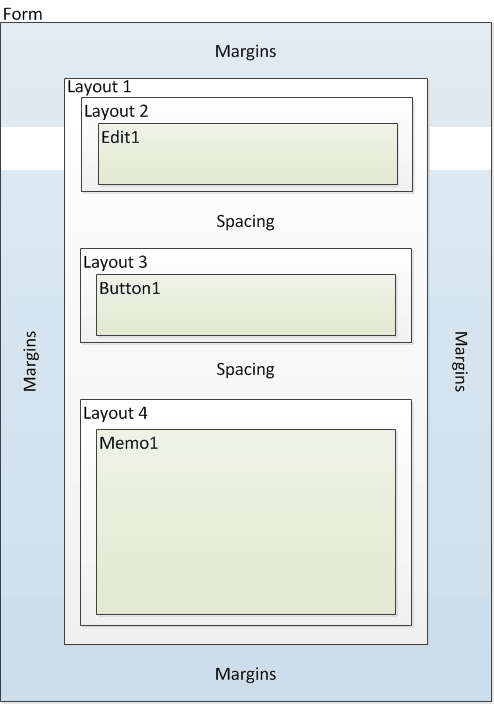
Layout 1 is placed on a form. Distance between the Layout 1 and form borders is 3 pixels (set by the Margins parameter).
Layout 2 is placed at the top of the Layout 1. Theres actually no difference between Layout1.Top and Layout2.Top (same goes for .Left and .Width) I just had to draw a little space between to separate the two visually. Edit2 has exactly the same .Width, .Height, .Left and .Top as Layout 2.
Then theres a Spacing (3) pixels empty space and Layout 3 / Button1 are laid out just like Layout 2 and Edit1.
Layout 3 is followed by another Spacing pixels of empty space and then Layout 4 takes all the space there was left. Memo1 is resized to take all the space inside Layout 3.
Result
Viewed in Chrome, the form looks quite nice (as does in other browsers and on mobile devices).